eBay: It's Photography That Sells
- by Peter Lerman (copyright 2010)
LIGHTS! (continued)
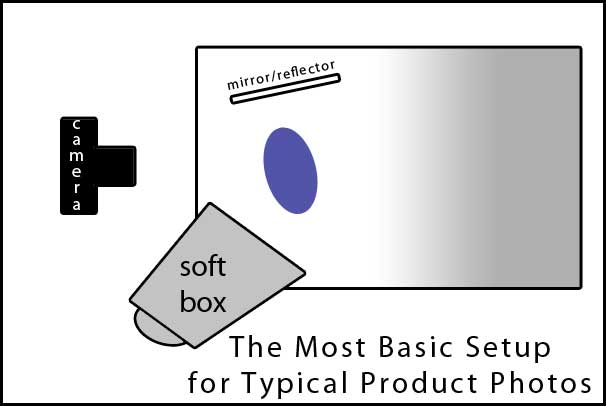 The lighting set up shown here is very simple and easy to do. Just as with all the other tips I am giving you, there are the elegant and more expensive ways to do things and the much less inexpensive ways. Both can be quite effective.
The item labeled "soft box" is a common photographer's tool (a light modifier) that consists of an empty box, usually about 2' or more on a side, with a light at the back and a gauzy white fabric on the front. All the interior surfaces except the front are opaque and reflective (shiny) and the outside surfaces are usually black.
The box is most often made of fabric of some kind stretched over a metal or fiberglass frame. In bygone days these soft boxes were either quite expensive or home made. You can still make your own if you like. The best material is white 'Foam core' board from the craft store cut to the right size and taped together to make a box.
The front, translucent side can be covered with white gauze, tracing paper or a piece of a white shower curtain liner. Cut a hole in the back and stick your light into it. Done. The home made one will leave it up to your ingenuity to figure out how to get it to stay on the top of a light stand.
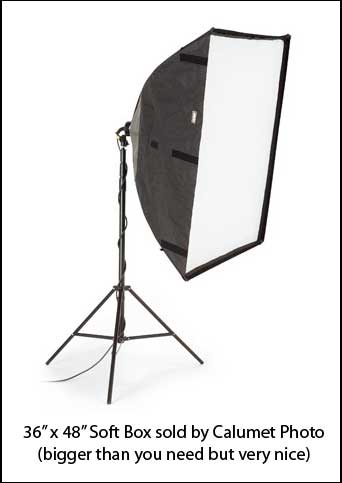 The middle ground on price between home made and professional grade is the inexpensive Chinese imports available on eBay. Much simpler to set up than trying to make one yourself and more durable and versatile. Shop around and you'll find one for $25 to $40; money well spent. With careful use they will last years. This large one (left) from Calumet Photo is on eBay for under $100 (closer to the 'high ground').
The purpose of the soft box is to soften the light. It makes the light source effectively "bigger" and thereby more natural looking and flattering; shadows much softer, surface flaws less apparent.
With an on-camera flash, the size of the light source is tiny; about a half-inch square or so. With the soft box the size of the light source is about 2' square or larger. Once you move the light source off the camera and make it this big the light becomes less 'flat' and can define shapes much better.
If the reflection of the soft box can be seen in your shot (sometimes this is unavoidable) it will be a large, soft white square. It won't be a bright, harsh little spot of bright light.
Here is a simple little porcelain figure my Dad brought home from China after his tour of duty during the Second World War. In the photo on the left I used the on-camera pop-up flash on my Nikon D300. Even though the table-top surface and the setting are excellent (no clutter, no distractions) and the camera plus lens costs about $2,000 the shot looks pretty 'blah'. Even with a zillion mega pixels!
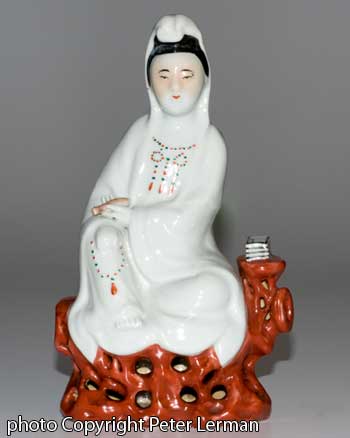
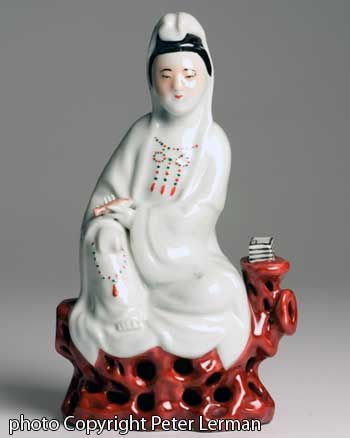
The photo on the right is the exact same everything except I used a light in a soft box off to my right side instead of the on-camera flash. Look at the contours of the face. Look at the way the side light brings out the folds in the garment. Which one looks more "three dimensional"? Which one looks like something you'd like to have in your curio cabinet? All other things being equal, which one would you be more willing to shell out good money for?
Here's the same exercise again with a tough item to photograph: a black digital camera. One shot uses the on-camera flash and one uses a softbox off to my right and a large white reflector card (cardboard) off to the left. To my eye, one shot looks professional showing all the details and contours. The other one by comparison looks amateurish.

You will need a light stand to put your soft box on. Again, the inexpensive ones are fine. You only need a maximum height of about 6'. Buy a pair of stands if you get a good deal. The other one will come in handy later on.
What goes into the Soft Box? A Light!
or